获取前端项目方式
前端项目获取方式目前有两种,请您根据项目不同需求进行选择:
1. 获取 hippius 现有工程
适用于对管理平台没有二次开发的项目
直接获取 dist 包,可直接进行部署
2. 在 hzero 基础项目上安装 hippius 相关依赖
适用于对管理平台有二次开发的项目
适用于已有 hzero 基础项目,仅希望使用 hippius 管理端相关功能
如果项目没有二次开发,不推荐
注意: 0.9、0.10版本只能使用第一种方式
1.1 获取 hippius 现有工程
种子工程/种子工程打好的dist包 密码(handhand)
如果是部署dist包(不管是下载来的,还是用种子工程自己打包的,或者其他途径),记得需要做参数替换操作
替换对应的参数:
 BASE_PATH: 'BUILD_BASE_PATH',
 PLATFORM_VERSION: 'BUILD_PLATFORM_VERSION',
 WEBSOCKET_HOST: 'BUILD_WEBSOCKET_HOST',
 BPM_HOST: 'BUILD_BPM_HOST',
 CLIENT_ID: 'BUILD_CLIENT_ID',
 API_HOST: 'BUILD_API_HOST',
 ATTACH_SIZE: 'BUILD_ATTACH_SIZE', // 对素材库图文信息附件大小进行配置(单位:M)
执行命令替换(例如):
find dist -name '*.js' | xargs sed -i "s BUILD_API_HOST http://xxxx.saas.hand-china.com g"
find dist -name '*.js' | xargs sed -i "s BUILD_CLIENT_ID hippius-front-dev g"
find dist -name '*.js' | xargs sed -i "s BUILD_BPM_HOST http://xxxxxxxx:8330 g"
find dist -name '*.js' | xargs sed -i "s BUILD_WEBSOCKET_HOST ws://xxxxxxxxx:8260 g"
find dist -name '*.js' | xargs sed -i "s BUILD_ATTACH_SIZE 8 g"
如果您使用的是海马汇提供的「种子工程」,之后您可以【跳过这一页】文档了,直接开始环境搭建即可开始开发使用。
如果您使用的是海马汇提供的「种子工程打好的dist包」,那么替换参数之后就可以直接部署了,编译后的代码没法再做开发了。
项目部署:可以参考hzero文档,从「部署项目」的第二点开始看,项目打包参看项目的readme。
1.2 安装 hippius 相关依赖
在新的 hzero 项目生成工具 hzero-cli 与旧的生成工具 hzero-front-cli 生成项目上安装 hippius 依赖的步骤不同,请先判断现有项目是何种工具生成。
1.2.1 在 hzero-front-cli 创建项目上安装
一、editor 相关功能
由于海马汇的图文内容使用了秀米+Ueditor,秀米仅支持Ueditor编辑器,Ueditor已经荒芜多年,仅剩源码版本,需要引入相关文件。
下载ueditor压缩包,解压在主目录public/下,即public/src/components/hipsUeditor
在主目录src/index.js引入 editor, 以在项目启动时异步地加载。
// 轮播图闪屏/企业频道自定义消息素材库的秀米富文本
import * as loadEditor from 'hippius-front/lib/components/hipsEditor/loadEditor';

// 加载的秀米富文本
loadEditor.load();
二、添加依赖
在主目录 package.json 文件的依赖中增加:
"hippius-front": "^0.9.0",
"hippius-front-analyse": "^0.9.0",
"hippius-front-app": "^0.9.0",
"hippius-front-contact": "^0.9.0",
"hippius-front-msggroup": "^0.9.0",
"hippius-front-subapp": "^0.9.0"
"hippius-front-qnr": "^0.9.0"
"hippius-front-problem": "^0.9.0"
关于 Hippius 的版本选择, 需要与当前项目中的 Hzero 版本对应,对应关系详见本章最后-[1.4 Hippius 与 Hzero 版本对应]。
执行 yarn install
三、添加页面路由
在主目录src/utils/getModuleRouters.js文件中,引入以下路由。
import * as hippiusFrontAnalyse from 'hippius-front-analyse/lib/utils/router';
import * as hippiusFrontApp from 'hippius-front-app/lib/utils/router';
import * as hippiusFrontContact from 'hippius-front-contact/lib/utils/router';
import * as hippiusFrontMsggroup from 'hippius-front-msggroup/lib/utils/router';
import * as hippiusFrontSubapp from 'hippius-front-subapp/lib/utils/router';
import * as hippiusFrontQnr from 'hippius-front-qnr/lib/utils/router';
import * as hippiusFrontProblem from 'hippius-front-problem/lib/utils/router';
并且在文件末尾的数组里,将这些路由加上
export default app =>
  getModuleRouters(app, [
    hippiusFrontAnalyse,
    hippiusFrontApp,
    hippiusFrontContact,
    hippiusFrontMsggroup,
    hippiusFrontSubapp,
    hippiusFrontQnr,
    hippiusFrontProblem,
    // other hzero routes
    // other your routes
  ]);
四、修改打包文件路径正则
修改主目录 webpack 配置config/webpack.config.js,避免hippius包中的样式类被污染
// hzero1.1.0开始的webpack,只需要改一处
// TODO: 需要修改占位符 第二个 hzero-front
const projectReg = '(hzero-front|hzero-front)(-([\\w-]*))?';

// 改为:
const projectReg = '(hzero-front|hippius-front)(-([\\w-]*))?';


// hzero1.1.0之前的webpack,如下修改
// 替换 hzero-front.. 等正则,将其替换为 (hippius|hzero)-front..
// 例如:
const hzeroFrontChildNodeModulePathReg = new RegExp(
    `hzero-front\\S*\\${path.sep}node_modules`);
// 替换为:
const hzeroFrontChildNodeModulePathReg = new RegExp(
    `(hippius|hzero)-front\\S*\\${path.sep}node_modules`);

// 具体替换次数视不同版本的 Hzero wepback配置文件内容而定。
// 以下替换内容作为参考:

// hzero-front 子项目里的node_modules路径
const hzeroFrontChildNodeModulePathReg = new RegExp(
`(hippius|hzero)-front\\S*\\${path.sep}node_modules`);

// hzero-front 子项目代码路径
const hzeroFrontBuildLibPathReg = new RegExp(
  `(hippius|hzero)-front\\S*\\${path.sep}lib`);

// 大约123行附近的这个正则,把hippius加上,搜索【css-loader】所在的对象里的getLocalIdent这个函数里
  const match = context.resourcePath.match(
    new RegExp(`(src|(hippius|hzero)-front\\S*\\${path.sep}lib)(.*)`));
1.2.2 在 hzero-cli 创建项目上安装
一、editor 相关功能
由于海马汇的图文内容使用了秀米+Ueditor,秀米仅支持Ueditor编辑器,Ueditor已经荒芜多年,仅剩源码版本,需要引入相关文件。
下载ueditor压缩包,解压在主目录public/下,即public/src/components/hipsUeditor
在项目自动生成的公共模块/packages/[project-name]-common/src/config/customize/index.tsx 中引入 editor, 以在项目启动时异步地加载。
// 轮播图闪屏/企业频道自定义消息素材库的秀米富文本
import * as loadEditor from 'hippius-front/lib/components/hipsEditor/loadEditor';
// other codes
// 加载的秀米富文本
loadEditor.load();
二、添加依赖
此步骤与上面在 hzero-front-cli 中第二步添加依赖步骤一样。
三、引入打包模块
在主目录src/.hzerorc.js文件的 packages 配置中,添加 hippius 相关依赖名。
并加入对 projectReg 项配置:
module.exports =  {
  "projectReg": '(hzero-front|hippius-front)(-([\\w-]*))?',
  "packages": [
    // other hzero package name
    // other your package name
    {
      "name": "hippius-front"
    },
    {
      "name": "hippius-front-analyse"
    },
    {
      "name": "hippius-front-app"
    },
    {
      "name": "hippius-front-contact"
    },
    {
      "name": "hippius-front-msggroup"
    },
    {
      "name": "hippius-front-subapp"
    },
    {
      "name": "hippius-front-qnr"
    },
    {
      "name": "hippius-front-problem"
    },
  ],
  // other config
};
注意:
1. projectReg 这样的配置会影响打包及启动时 hippius 模块的 less 文件转码是否要用css-module 模式
2. 在做如上修改后启动前一定要重新执行 yarn run build:ms编译 hippius 各模块
四、进行编译
在主目录执行 yarn run build:ms 选择 hippius 的各包进行编译
1.3 常见错误
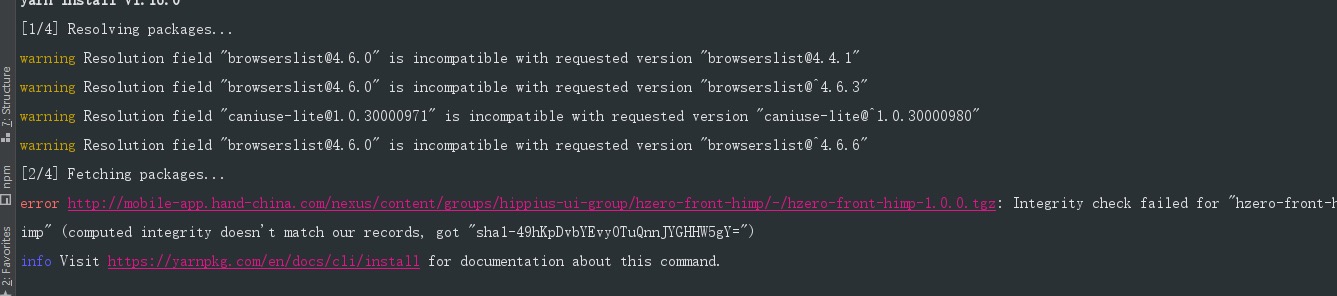
依赖版本不匹配:
yarn的时候某个包报无法匹配的错误(did not match和dosen’t match)。因为同版本发了多次包,删除yarn.lock中对应的包的信息,重新yarn即可
图例:图中错误都是hzero-front-himp-1.0.0.tgz,报错都是无法匹配(did not match和dosen’t match)
mac:

window:
postcss-svgo报错:(2019-10-30)
svgo@1.3.1有问题,dependencies和resolutions里加svgo的依赖,指定1.3.0版本或1.3.2,可以过一段时间再改回来(指的是svgo指定版本的依赖)


1.4 Hippius 与 Hzero 版本对应
| Hippius | Hzero |
|---|---|
| v0.3.0 | v1.0.0 |
| v0.5.0 | v1.1.0 |
| v0.7.0 | v1.2.0 |
| v0.8.0 | v1.2.0 |
| v0.9.0 | v1.3.0 |